Smartphone Camera Tips: How to Actually Take Better Photos (Not Just Buy a Better Phone)
So you dropped $1,200 on a flagship phone because the camera specs looked insane. 108MP sensor. Night mode. AI enhancement. The works.
Then you take a photo and it looks… fine. Not amazing. Just fine.
I’ve been there. Last year I upgraded from an iPhone 12 to a 14 Pro specifically for the camera. Took it on vacation, came back with 300 photos that looked basically the same as my old phone. Turns out specs don’t matter if you don’t know how to use them.
Here’s what actually makes a difference.
This article is part of our comprehensive guide on Smartphones and Mobile Technology. For the full guide, visit the pillar page.
The Settings You’re Probably Ignoring
First things first. Your phone’s camera app has settings. Most people never touch them. I didn’t for two years.
Turn Off Auto HDR (Sometimes)
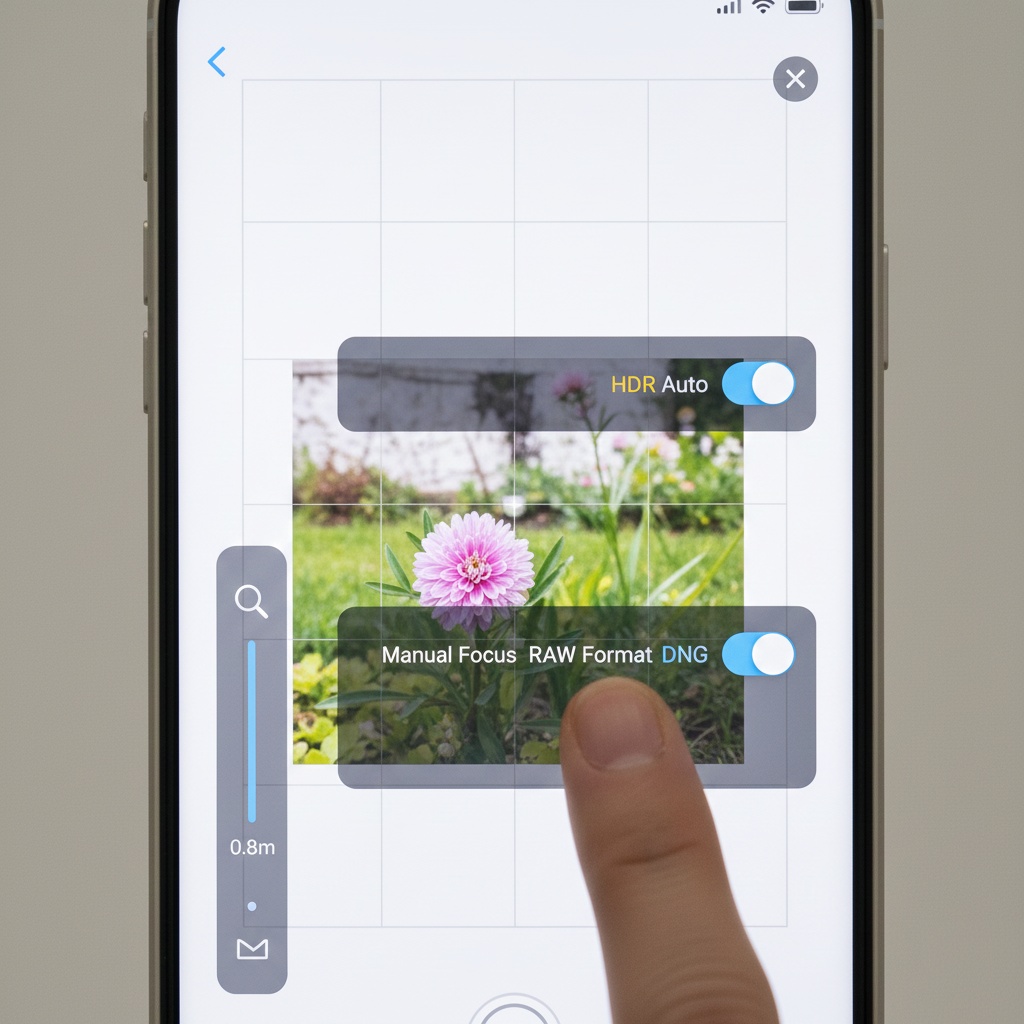
HDR is great. It balances bright skies with dark foregrounds. But here’s the thing: auto HDR on iPhones and Samsung phones fires off constantly, even when you don’t need it. This creates that weird, over-processed look where everything looks flat.
Real talk: I shoot with HDR off about 60% of the time now. If the scene isn’t super contrasty (like a sunset), standard mode actually looks more natural. You can always edit later.
Pro tip: On iPhone, go to Settings > Camera and turn off “Auto HDR.” On Samsung, open Camera > Settings > HDR and set it to “Off.” You can still trigger HDR manually when you need it.
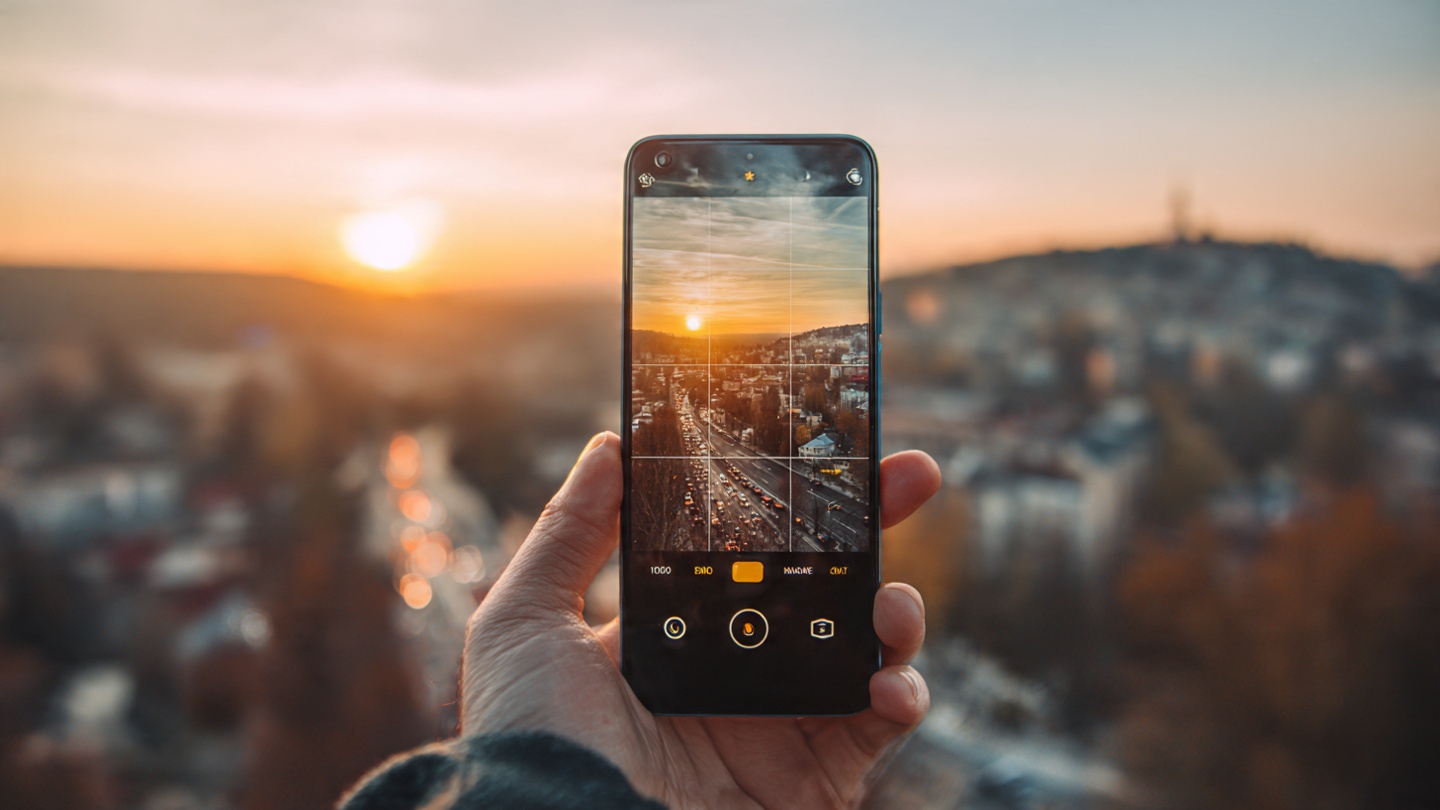
Grid Lines Are Your Friend
This one’s basic but I see people skipping it all the time. Turn on the grid overlay. It shows you the rule of thirds lines, which instantly makes your composition better.
I enabled this after taking a bunch of vacation photos where the horizon was crooked in every single shot. Now I line things up without thinking about it.
How to enable:
- iPhone: Settings > Camera > Grid (toggle on)
- Android: Camera app > Settings > Grid lines
Shoot in RAW (If Your Phone Supports It)
Most flagship phones from 2022 onward can shoot in RAW or ProRAW format. This gives you way more control when editing. The file sizes are bigger (like 25MB per photo vs 3MB for JPEG), but if you’re serious about getting good shots, it’s worth it.
I started using ProRAW on my iPhone 14 Pro about six months ago. The difference when editing in Lightroom is night and day. You can recover blown highlights and pull detail out of shadows that would be completely lost in a regular JPEG.
Where to find it:
- iPhone: Settings > Camera > Formats > Apple ProRAW
- Samsung: Camera app > More > Pro mode > RAW
Lighting: The Thing That Actually Matters
Forget megapixels. Forget computational photography. Good light beats everything.
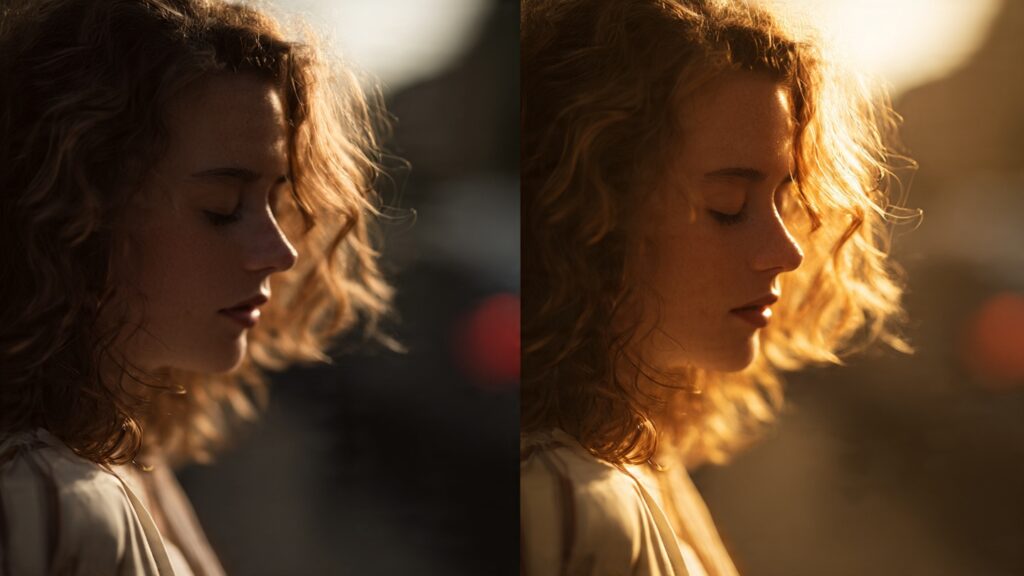
Golden Hour Is Real
You know those Instagram photos that look impossibly good? They’re probably shot during golden hour (the hour after sunrise or before sunset). The light is soft, warm, and directional. Your phone’s camera can actually handle it.
I tested this last month. Took the same photo of my dog at noon and then at 6 PM during golden hour. The noon shot looked harsh and washed out. The golden hour shot looked like I knew what I was doing.
Reality check: You can’t always wait for golden hour. But if you’re planning a specific shoot (family photos, product shots, whatever), schedule it for early morning or late afternoon. It’s a free upgrade.
Avoid Direct Overhead Sun
Midday sun creates harsh shadows under eyes, noses, and chins. Your phone’s camera tries to compensate with HDR, but it can only do so much.
If you have to shoot at noon, find some shade. Overcast days are actually better for portraits than bright sunny days. The clouds act like a giant softbox.
Use Window Light for Indoor Shots
Natural light from a window is basically studio lighting for free. Position your subject near a window (not directly in front of it) and you’ll get that soft, flattering light everyone’s trying to replicate with ring lights.
I’ve shot product photos for my side projects this way. Big window, white poster board as a reflector, and my phone. People assume I have a whole setup. Nope. Just a window.
Composition Tips That Actually Work
Get Closer Than You Think
The number one mistake I see? People shoot from too far away. Your subject ends up tiny in the frame, surrounded by distracting background stuff.
If you’re taking a photo of food, a person, or an object, get closer. Fill the frame. You can always crop out later, but you can’t add detail that wasn’t captured.
Watch Your Background
Your phone’s portrait mode does a decent job blurring backgrounds, but it’s not magic. I’ve taken shots where the blur effect cut off part of someone’s hair or made their glasses disappear.
Before you tap the shutter, scan the background. Is there a pole sticking out of someone’s head? A trash can right behind them? Move a few feet to the left or right. Clean backgrounds make your subject pop.
Use Negative Space
Empty space in your photo isn’t wasted space. It gives your subject room to breathe. Some of my favorite shots have the subject taking up maybe 30% of the frame, with sky or a clean wall filling the rest.
This also works great for text overlays if you’re shooting for social media or a blog post.
The Portrait Mode Reality
Portrait mode on modern phones is impressive. But it’s not perfect.
It Struggles with Hair
Every portrait mode implementation (iPhone, Samsung, Google Pixel) has trouble with fine details like hair, especially if there’s backlighting. You’ll get weird blur artifacts around the edges.
Fix: Position your subject so their hair is against a contrasting background. Dark hair against a light wall works way better than hair against a busy background.
Don’t Use It for Everything
Portrait mode is great for, well, portraits. It’s terrible for group shots where people are at different distances. The blur algorithm gets confused and starts blurring people’s faces while keeping the background sharp.
I learned this the hard way at a family gathering. Half the people in the photo were blurred. Just use regular photo mode for groups.
Night Mode: When It Works (and When It Doesn’t)
Modern phones have crazy good night mode. My iPhone 14 Pro can shoot usable photos in almost complete darkness. But there are caveats.
You Need to Stay Still
Night mode takes multiple exposures and combines them. If you move, or your subject moves, you’ll get blur or ghosting. I’ve ruined so many night photos by not keeping the phone steady.
Solution: Brace your phone against something solid (a wall, a table, your knee). Or get a cheap phone tripod. They’re like $15 on Amazon and make night shots way sharper.
It Can Look Unnatural
Night mode cranks up the brightness and saturation to make dark scenes look brighter. Sometimes this looks amazing. Other times it makes things look fake, like a video game.
If your night photo looks over-processed, try taking a regular shot without night mode and editing it later. Sometimes a darker, moodier photo looks better than an artificially brightened one.
Editing: The Secret Weapon
The best smartphone photos I’ve seen aren’t straight out of camera. They’re edited. Not heavily, just tweaked.
Use Your Phone’s Built-In Editor
You don’t need Lightroom or Photoshop. The native editing tools on iPhone and Android are surprisingly powerful.
My basic editing workflow:
- Adjust exposure (usually down a bit)
- Bump up contrast slightly
- Increase saturation by 5-10%
- Sharpen if needed
- Crop for better composition
This takes 30 seconds and makes every photo look more polished.
Don’t Overdo Filters
Instagram filters are tempting. They’re one tap and your photo looks cool. But they’re also obvious. I can spot a Valencia or Clarendon filter from a mile away.
If you’re going to use presets or filters, dial them back to 50% intensity. Or better yet, learn to edit manually. It takes longer but your photos won’t look like everyone else’s.
Quick Wins You Can Use Today
Here are the things that made the biggest difference for me:
Clean your lens. Seriously. Your phone’s been in your pocket collecting lint and finger grease. Wipe it with your shirt before you shoot.
Use the volume buttons to take photos. It’s more stable than tapping the screen. You’ll get sharper shots, especially in low light.
Tap to focus before shooting. Your phone’s autofocus is pretty good, but manually tapping your subject ensures it’s sharp where you want it sharp.
Take multiple shots. Even pros shoot bursts and pick the best one. Nobody gets the perfect shot on the first try.
Turn off beauty mode. Unless you specifically want the smoothed skin look, turn this off. It makes people look plastic.
What About All Those Camera Apps?
There are about 1,000 third-party camera apps claiming to make your photos better. Halide, ProCam, Adobe Lightroom Camera, etc.
Do you need them? Probably not.
I’ve tried Halide and ProCam. They give you more manual controls (shutter speed, ISO, white balance), which is cool if you’re into that. But for 90% of people, the stock camera app is totally fine.
Exception: If you want to shoot in RAW on an Android phone that doesn’t support it natively, or you need specific features like focus peaking, then yeah, grab a third-party app.
The Gear That Actually Helps
You don’t need a ton of accessories, but a few things make a real difference:
Phone tripod ($15-30): Stabilizes shots, enables long exposures, lets you get in the photo yourself.
Clip-on lenses ($20-50): Wide angle or macro lenses that physically clip onto your phone. The quality varies wildly, but a good wide lens is great for landscapes.
Portable LED light ($20-40): For shooting in low light when you need more than your phone’s flash. Way better than the built-in LED.
I bought a cheap Joby tripod two years ago and it’s been in my bag ever since. Best $25 I’ve spent.
Common Mistakes I Still Make
Even after doing this for years, I still mess up. Here’s what I catch myself doing:
Shooting everything in the same orientation. Mix it up. Vertical for portraits and stories, horizontal for landscapes.
Not checking exposure before shooting. I’ll realize later that half the photo is blown out because I didn’t check the screen.
Forgetting to lock focus and exposure. On iPhone, you can lock these by holding your finger on the screen until “AE/AF Lock” appears. Prevents the camera from refocusing when you reframe.
Taking one photo and moving on. I’ve learned to shoot 3-5 versions with slightly different angles or settings. One of them is always better than the first shot.
The Bottom Line
Your phone’s camera is probably better than you think. The issue isn’t the hardware, it’s knowing how to use it.
You don’t need the latest flagship phone. My friend shoots incredible photos on a three-year-old Pixel 6. He just understands light, composition, and basic editing.
Start with the basics: clean lens, good light, clean background. Get those right and your photos will immediately improve. Then experiment with the other stuff as you go.
And honestly? The best camera is the one you have with you. I’ve taken some of my favorite shots on older phones just because I happened to be there at the right moment. Technical perfection matters less than timing and composition.
Now go shoot something.
Related Articles
Want to dive deeper into smartphone photography? Check out these guides:
- Best Smartphones for Photography – Top camera phones of 2025
- Smartphone Accessories Guide – Essential gear for mobile photography
- Best Smartphones of 2025 – Complete phone reviews and comparisons
- Smartphone Buying Guide – How to choose the right phone for your needs